ElasticSearch使用JDBC协议
ElasticSearch使用JDBC协议
ElasticSearch自6.3.2版本开始支持JDBC协议。也就是说,我们可以用SQL来查询ElasticSearch。
但elastic.co本身竟然还留了一手,竟然需要白金版(platinum)才能使用SQL。研究了一下,总结一下如何破解ElasticSearch的这一坑爹的限制。
STEP 1:破解x-pack-core-{version}.jar
我们第一步需要破解x-pack-core-{version}.jar。
x-pack-core-{version}.jar的路径在./modules/x-pack/x-pack-core/下。拷贝出来后,执行使用Java的反编译工具进行反编译。我使用的是luyten,感觉还是比较好使的。如果是mac的话,我之前都是用jd-gui,感觉也很好。
破解LicenseVerifier
找到org.elasticsearch.license包下的LicenseVerifier,它里面有两个验证方法,都直接改成true:
package org.elasticsearch.license;

import org.elasticsearch.license.License;

public class LicenseVerifier
{
    public static boolean verifyLicense(final License license, final byte[] encryptedPublicKeyData) {
                return true;
    }

    public static boolean verifyLicense(final License license) {
                return true;
    }
}
编译LicenseVerifier
类似这般重新编译LicenseVerifier.java
javac -cp "/mnt/home/admin/cydw-dev/install/elasticsearch/modules/x-pack/x-pack-core/x-pack-core-6.3.2.jar:/mnt/home/admin/cydw-dev/install/elasticsearch/lib/lucene-core-7.3.1.jar:/mnt/home/admin/cydw-dev/install/elasticsearch/lib/elasticsearch-core-6.3.2.jar" LicenseVerifier.java
破解XPackBuild
找到org.elasticsearch.xpack.core包下的XPackBuild,将最后面的那个static中的try里面的内容都删除
static {
    final Path path = getElasticsearchCodebase();
    String shortHash = null;
    String date = null;
    Label_0157: {
        shortHash = "Unknown";
        date = "Unknown";
    }
    CURRENT = new XPackBuild(shortHash, date);
}
注意:不同版本的上述代码有所不同,但本质差不多。
编译XPackBuild
类似这般重新编译XPackBuild.java
javac -cp "/mnt/home/admin/cydw-dev/install/elasticsearch/modules/x-pack/x-pack-core/x-pack-core-6.3.2.jar:/mnt/home/admin/cydw-dev/install/elasticsearch/lib/lucene-core-7.3.1.jar:/mnt/home/admin/cydw-dev/install/elasticsearch/lib/elasticsearch-core-6.3.2.jar" XPackBuild.java
重新打包x-pack-core-{version}.jar
解压x-pack-core-{version}.jar
jar -xf x-pack-core-{version}.jar
然后删除当前目录下的x-pack-core-{version}.jar
rm -rf x-pack-core-{version}.jar
将前面编译好的LicenseVerifier.class和XPackBuild.class拷贝到原始位置:
cp LicenseVerifier.class ./org/elasticsearch/license/LicenseVerifier.class
cp XPackBuild.class ./org/elasticsearch/xpack/core/XPackBuild.class
重新打包x-pack-core-{version}.jar:
jar -cvf x-pack-core-{version}.jar *
打包好后,拷贝会刚才的elasticsearch目录下,待会重启elasticsearch。
STEP 2:修改ElasticSearch配置
修改elasticsearch.yml,增加一处配置:
xpack.security.enabled: false
修改完成后,我们可以重启elasticsearch了。
如果是Ambari版本
Ambari使用界面化来管理配置,但它自身有点BUG,其中自定义的配置不生效.翻了一下Ambari的代码,是Ambari生成elasticsearch的配置模板有问题,压根没有自定义配置的地方.
于是我们简单修改一下elasticsearch.master.yaml.j2和elasticsearch.slave.yaml.j2,分别增加一行:
xpack.security.enabled: false
elasticsearch.master.yaml.j2路径在/var/lib/ambari-agent/cache/common-services/ELASTICSEARCH/6.3.2/package/templates/elasticsearch.master.yaml.j2elasticsearch.slave.yaml.j2路径在/var/lib/ambari-agent/cache/common-services/ELASTICSEARCH/6.3.2/package/templates/elasticsearch.slave.yaml.j2
STEP 3:注册得到一个试用的license
我们去https://license.elastic.co/registration注册一下,为了得到一个试用的license。
注意:Country这一栏得选择成China。
STEP 4:修改license文件
在我们注册完成后,我们从邮箱下得到license文件。我们修改一下这个文件: 将type修改为platinum,expiry_date_in_millis是过期时间,修改成3107746200000,也就是2050年。
{
    "license": {
        "type": "platinum",
        "expiry_date_in_millis": 3107746200000
    }
}
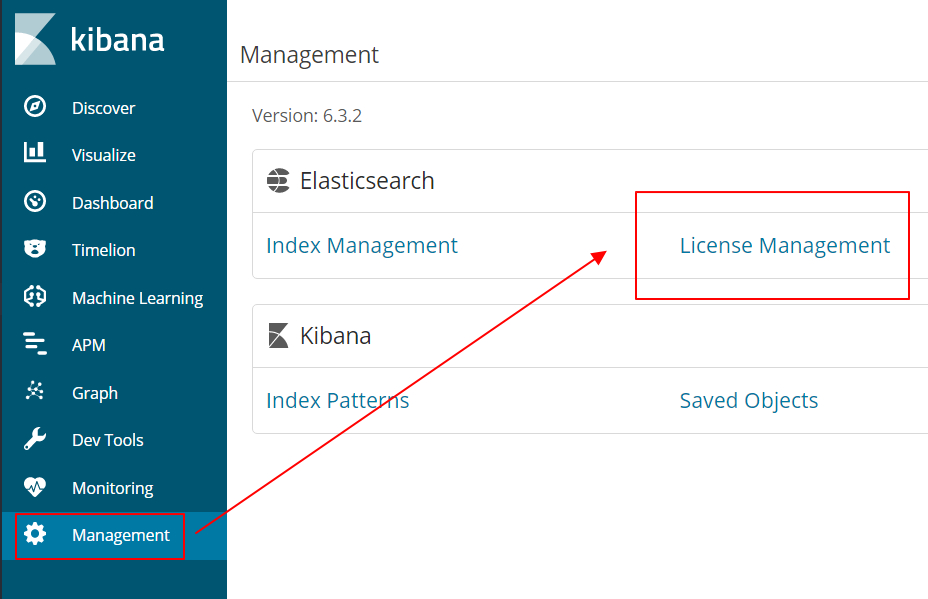
STEP 5:上传license文件
下面我们需要把license文件发送给elasticsearch,使用语句:
curl -XPUT "http://<es_host>:<es_port>/_xpack/license?acknowledge=true" -H "Content-Type: application/json" -d @license.json
也可以使用kibana来更新:
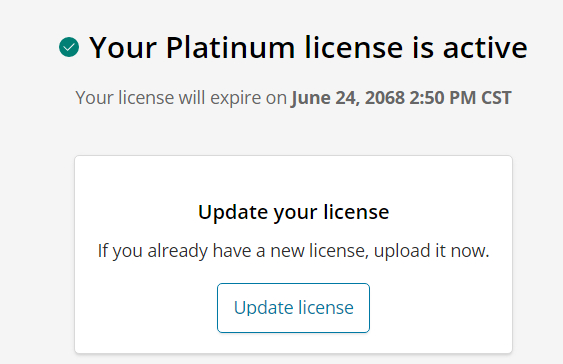
现在我们的白金版已经激活了: